In linux at least whenever I open the program (past versions too), the window appears wider than the screen so I loose the rightmost part of it, so I have to grab it and “maximize” it so it fits the screen
In this version I loose the analog scope view and there seems to be a bug with the analog trace, only shown in the right side and voltage values shown in the middle.
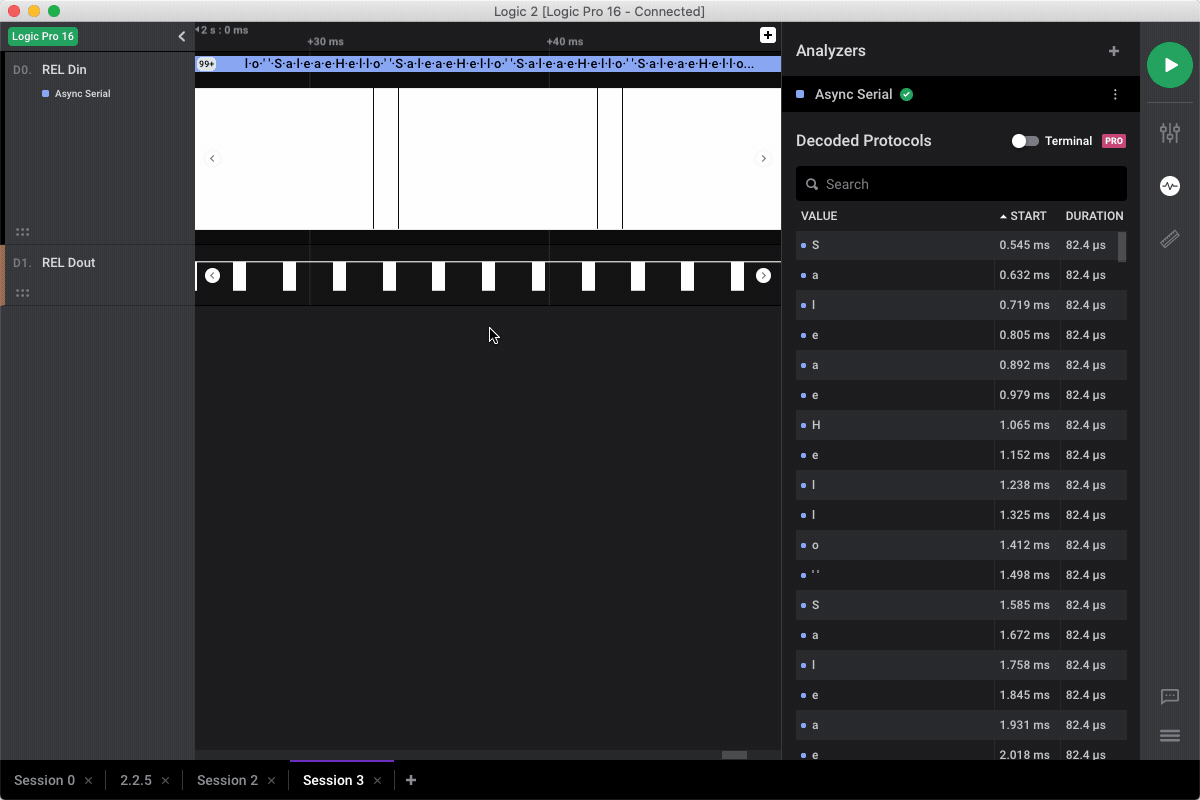
The timing marker pair measurement window REALLY REALLY also has to show something like 1/delta to show the “frequency”
For e.g. I’m missing something like:
[File] -> [open]
especially for a user new to this it might be helpful, even if it might be “obvious” to hit [Ctrl]+[O] or to just drag and drop.
What does [Ctrl+X] actually do? It’s mentioned in the context menu, but not in the short cuts.
On an English keyboard things like = and - are besides each other. (alter font type). This might be pretty obvious for an English keyboard layout, but unreachable on say an German keyboard. I suggest to change the concept assigning the short cuts more logical instead of assigning them perfectly fitting on one single keyboard layout.
The logical choice would be to assign [Ctrl][+] and [Ctrl][-] to alter the font size.
I can scroll in and scroll out, but what ever I do, those white phantom shadows do remain and the only thing which moves is the colorful analyzer displays.
Looks like a scaling problem. the left side is the original screen and the right side is the zoomed out area due to the decreased font size.
Steps to reproduce:
open a capture
change the font to a minimum
Zoom in Zoom out, go left go right. The ghost of the capture will remain.
The configuration pane takes much more space on the screen, but is harder to read and deal with than the previous release.
Especially, I need to scroll down to see all the parameters.
Has the nice Autobaud option disappeared?
Again, light grey on dark grey is a real challenge. Is there a way to get a plain interface, ie. black on white, for the menus and configuration panes?
Same comment for the menus that show up only when hovering them.
Below, the second Async Serial shows the three dots only when the mouse hovers on it. How to know some parts of the interface offer interactivity and other no?
We haven’t seen that on Linux, which distro are you running?
In this version I lose the analog scope view
We removed the scope view for the time being. It has too many bugs and we’re re-evaluating our solution for analog analysis. Were you using it? I’d love to learn more.
voltage values shown in the middle
This is very strange. It might be related to the first bug above, but hard to say.
The timing marker pair measurement has to show something like 1/delta to show the “frequency”
Can you please elaborate? What do you use it for?
Anyway, we’re planning on making it extensible and allow users to add their own measurements. btw, have you tried using the measurements (Shift + select a region)?
Thanks for letting us know! (and providing steps to reproduce)
We’ll add that to our bugs list. We’re currently working on high-level analyzer, Python measurements, stability and performance, therefore, it might take some time until we’ll get to that. My apologies in advance
Well it was a handy tool to have when dealing with analog signals, the trigger voltage selection worked very good, like an oscilloscope, I used it quite a bit and never found an issue or bug with it, I liked it.
It also showed the past traces with a softer/transparent blue, useful to see Jitter in signals, I would really like to have the scope view back. But if you are working in a new approach it would also be worth waiting to see what you guys comes up with!
Often when using the time marking pair, the time difference alone doesn’t give a meaningful idea, lets say I measure a serial message that I don’t know its baud rate, I identify a single bit and use the time marking pair to get how long a bit takes to send. A value of “0.000 008 661 s” is non intuitive and would require me to get my pocket calculator, but 1/delta says: 115460.1 Hz then I immediately know that it is a 115200 baud transmission. The same idea translates to a lot of use cases if you want to know how often that thing would happen if it repeats afterwards, all the oscilloscopes that I have seen give you the option to calculate 1/delta when using cursors, it is a basic feature, and should be available by default in my opinion.
Yes I have, it is a useful feature, it already includes the delta time, but the f_avg does not give the 1/delta information, and the f_avg is only available in the digital mode, another use case would be an actuator that receives a series of commands, you want to know how fast is the control loop being updated, you put a pair of marker at the start of consecutive actuator commands and you can easily get the 100Hz for example the actuator/screen/led is being updated.
Here are some issues that I have come across in the V2. NOTE: This is utilizing a plugin I wrote which I understand may not be in a supported state right now.
An analyzer plugin’s committed frames seems to now always create an entry in the “Decoded Protocols” subwindow even through no tabular text was added via AddTabularText() . (see Figure A below)
In simple protocols this probably does not seems like an issue but once you start adding complex framing into a protocol there can be a lot of cases where it simply is undesirable to provide all data in the decoded protocols section but it is still desired to render bubble text for the corresponding field in the logic waveform.
While the way the old Logic software worked was sufficient, if the way the new software works is the “desired behavior” I feel that it is essential to provide the user with more powerful filtering options in the decoded protocols subwindow. Otherwise they may be overburdened with useless information that makes scrolling through the protocol cumbersome. The protocol this plugin concerns can have SPI packets that span over one thousand bytes…but only a couple dozen bytes are what I consider essential to understanding the communication at a high level. In this plugin’s case, I felt it was best to enable powerful file export options in the plugin to inspect data more closely and keep the tabular text for more high-level information. Searching for a message data byte equal to 0x33 (as an example) could yield many matches with no context of what that byte actually addresses in the protocol. And then removing the “search expression” in the decoded protocols subwindow there is no automatic navigation to what was last selected before clearing the search (see Figure B illustrating this behavior below using the old software)
Some ideas on this: Support user-specified regular expressions in the search bar or provide an API to allow a plugin to fetch the user-defined search expression and allow it to handle returning relevant search results in the tabular text. This could enable plugins to support custom query operations that otherwise would not be possible with a baseline regular expression evaluation (i.e. special query commands)
It seems the wrong metadata is being used in the UI from what the analyzer plugin API provides. The UI appears to be using the configuration’s SetTitleAndTooltip() strings instead of the AddChannel() strings. (see Figure A below)
On this note to help support potentially long channel names, the UI may want to support the use of an ellipsis to trim the channel name string when it would otherwise exceed the horizontal rendering space and provide a tooltip to help a user resolve the full name of the channel. Or alternatively make the channel column re-sizable to fit the full name of the channels’ strings.
Figure A:
Figure B: Example showing search behavior of old Logic software:
For comparison the Figures C and D below show what the old Logic software looked like regarding the channel names. The plugin simply uses “MOSI”, “MISO”, “CLOCK”, and “ENABLE” for each channel name when calling AddChannel(). The analyzer plugin itself is named “ABCC SPI Protocol”. As can be seen the “Analyzer settings” title for each channel is what the new Logic software is using instead for the channel name.
Figure C:
Figure D:
SIDE NOTE: In the image above the “Advanced settings” textbox is technically a AnalyzerSettingInterfaceText::FilePath which according to the original SDK document this type was supposed to have a file browse button. Is there any plan to add support for this? It would be very much appreciated if this support could be finally added in.
The UI renderer breaks (no recovery possible without application relaunch) when zooming in on capture. It is unclear what is causing this but worth mentioning. (see Figure E below)
You can use the *.sal linked above to test or even the software’s “simulation mode” currently causes this behavior (but I have no idea if the “simulation” is technically working from the V2 software side or not yet.)
Analyzer’s hamburger menu option “Stream to terminal” does not deselect and instead a click event for “Show in results table” is clicked during the “uncheck” click event. (see Figure F below)
The time shown in Figure G below seems to be handled wrong. I would expect this to say “-1 s” not “+9 s”. When you zoom in (this is from the *.sal available above) this gets corrected…so it seems to be an issue in the “most zoomed out” state of the capture.
On a similar note this capture has a large pre-trigger than I normally like and I wanted to reconfigure the pre-trigger buffer size. Is there a way to set this in the new software? On the old software you were able to set this in the application preferences. Currently it seems you must create a specific pre-trigger size by using some basic math (shown below). I usually like to have a fixed pre-trigger capture size to get a little bit of context of the conversation leading up to the trigger event but then like to change the capture duration after the event. This is a minor inconvenience that leads to managing two parameters instead of a single parameter when wanting to change the capture duration:
pre-trigger size in seconds = “After stopping, trim to last s.” - “Capture duration after trigger”
This could be an unintended side effect that Saleae never intended or perhaps an issue in V2. When making multiple calls to AddTabularText() Logic software V1 would display these as new lines in the “decoded protocols” where as V2 keeps the entries all on the same row. See Figure H below for comparison.
ANOTHER SIDE NOTE: The SDK has for quite some time had provisions for supporting transactions. Is there any plan to finally support this in someway? The protocol that this plugin is based on has a concept of a message “source ID” which is a method for tracking a command/response transaction in the SPI communication and allow for multiple commands to be invoked before responses are received. It would be interesting to hear what plans there are for supporting this.
Anyways, I have been watching V2 evolve for some months now…really great work and look forward to the continued evolution of this software.
Hopefully I missed something obvious. But often times I use a screenshot like image out to show some information. Sometimes on Forum other times bug reports.
One thing I often do as part of this is to wish to show timings. With version 1 software I might add a few measurements and output a screen shot of at times the whole window other times region, which show the timings. An example: was someone reported an issue with Teensy LC with updating an SSD1306 display… So I hooked one up and tried it… And sure enough there is some interesting stuff, where instead of just a 1ms delay between frames there is a larger delay with some output and then another display (turns out the buss is showing busy and the long delay is waiting for bus to not be busy, the short output is an I2C reset, and then small delay and than outputs the display.
So to document it I want to show the timings of these displays. With V1 it looks like:
First of all, thanks for the detailed response. It’s super helpful!
Debian bullseye
We’ll have to look into that, although it might take a while because we don’t have Debian installed at the moment (only Ubuntu for Linux). Sorry about that.
It also showed the past traces with a softer/transparent blue, useful to see Jitter in signals
Our plan is to build tools that will help you do this kind of analysis easily. I’d love to follow up once we’ll start working on that and get your feedback.
but the f_avg does not give the 1/delta information, and the f_avg is only available in the digital mode
We’ll (very) soon have Python measurements and you’d be able to add any type of measurement that you’d like. In your case, calculating the 1/delta will require 2-3 lines of code
I hope that this would be a good solution for your use case.
Good point. Unfortunately, you can’t do that at the moment, but it should be super easy to add. At the moment, you can only show the measurement properties when you click on it (you can also open the sidebar and see it there if it helps).
We’re planning on adding screenshot mode that will convert the background to white, and we should also show the data that you mentioned. I updated the feature request if you’d like to vote for it: https://ideas.saleae.com/b/feature-requests/light-theme/
Especially, I need to scroll down to see all the parameters.
We’ll look into that (we can probably make it a bit more compact)
Has the nice Autobaud option disappeared?
Temporarily. We’ll add that (and more) in the future.
How to know some parts of the interface offer interactivity and other no?
This is pretty common in apps, otherwise, the view becomes too clutters imo. You can also right-click on the item by the way. Unfortunately, I don’t see a way around it…
Unfortunately, they sometimes disappear.
Could it be that the app is not focused? For example, when you take a screenshot the app loses focus. We couldn’t reproduce it here (except for losing focus), please let me know if you know how to reproduce it
I could set a pair of markers and trim the trace. Nice!
Thanks for the detailed feedback. It’s absolutely great!
I’ll address the simple parts in this post, and later on, I’ll address the rest:
Analyzer’s hamburger menu option “Stream to terminal” does not deselect
It’s a bug, we fixed it already and should work properly on 2.2.6 (coming soon).
The time shown in Figure G below seems to be handled wrong
I think that it’s not as much wrong as confusing
It always shows the difference from the previous major tick (in this case -1 sec). However, we probably need to reverse that for negative values (show the difference from the next major tick).
On a similar note this capture has a large pre-trigger than I normally like and I wanted to reconfigure the pre-trigger buffer size. Is there a way to set this in the new software?
Not sure that I understand. Are you referring to your suggestion? pre-trigger size in seconds = “After stopping, trim to last s.” - “Capture duration after trigger”
I regards to your suggestion, you’re right - we’re planning on adding that.
By the way, you can now also trim the data.
Logic software V1 would display these as new lines in the “decoded protocols” where as V2 keeps the entries all on the same row
It’s on purpose (doesn’t mean that it’s the right decision of course). We’re working on extending the SDK to allow users to create multiple output fields that will be displayed in separate columns of the tables. I believe that having “Excel” like table would be much more useful.
Anyways, I have been watching V2 evolve for some months now…really great work and look forward to the continued evolution of this software.
Thanks!
We still owe you a few more answers. Probably in a day or two
Could it be that there are no more edges? The arrow is hidden if you are viewing the first / last edge. There is a foible that if you are clicking through edges and reach the first / last edge the arrow is shown while the mouse is over it, but hides when the mouse moves away and doesn’t cme back.
It always shows the difference from the previous major tick (in this case -1 sec).
Ahh now I get what you are saying now and I just noticed this same “-9s” switching to “-1s” when zoomed in (further) also existed in V1. I think the main confusion I had is that the “-10s” exists way way to the left and in V2 you can’t even pull the plot to display that time space like you could with V1 (though in this case the display would snap back to the real sampled time space).
NOTE: It seems the software design is trying to address this but the display of this information appears to be inconsistent when scrolling around. Which I think added to some of my confusion.
Not sure that I understand. Are you referring to your suggestion? pre-trigger size in seconds = “After stopping, trim to last s.” - “Capture duration after trigger”
I regards to your suggestion, you’re right - we’re planning on adding that.
Yes, I was asking if there was a setting somewhere that I had not noticed that would allow me to set the pre-trigger size like V1 had.
Also regarding my #3 when I get time I will start to try to debug this myself. This only happens in the plugin when adding the frames to the MISO/MOSI channels so it likely has to do with something about my framing. One suspicion I have is that my frames are non-aligned. I was under the impression that this may not have been technically supported behavior by V1’s SDK, but up to this point I had not had any real issue with the implementation/approach. See below to see how the bubble text frames are arranged between MISO and MOSI.
Another thing I just noticed…maybe it is normal…maybe not. The markers appear to use a different time reference (i.e. beginning of capture is time = 0 for the markers) from what the trigger condition uses. Below you can see it says 1.518 seconds but the marker resides between 0 seconds and -0.1 seconds.
I have problem with calibration.
In logic 1.2.29 - no problem, calibration file founded success;
In logic 2.2.5 - problem. the calibration file is not in the information window, the device identifier is clearly incorrect …